Have you ever thought about bringing a valiant warrior to life on paper? Perhaps the idea of creating a figure in shining armor has crossed your mind, but it felt a little out of reach. Well, you know, there's absolutely no need for any apprehension. That very knight, the one you picture with all their gleaming gear, can quite literally spring into existence right there on your page, and with surprising ease. This whole article is, as a matter of fact, set up to help you do just that. We're going to walk through the process together, making sure that what might seem like a complex task becomes something genuinely approachable and, frankly, quite fun.
You see, the path to sketching a knight, or really any figure that looks like a person, often starts with a very sensible first step. Before you even think about the metal plates or the flowing capes, it's pretty helpful to get a handle on the basic human shape. That's actually where a lot of folks begin, and it makes a lot of sense when you think about it. Once you have a good grasp of how a person's body is put together, adding all the knightly attire becomes much, much simpler. It's almost like building a house; you need the frame before you put up the walls and the roof, right? This guide is going to break down those initial steps, making it quite clear how to lay down that foundational human form.
So, get ready to discover how simple it can be to create a fantastic looking knight, complete with all the details you'd expect. We're going to go through this bit by bit, providing you with straightforward instructions and even some visual cues, if you follow along. By taking these rather simple actions, you too can, like, easily produce a truly splendid knight. It’s a process that is, in a way, designed to be very approachable, especially for those who might be new to drawing or just looking for a clear, step-by-step method. This guide, you'll find, makes it much less complicated to sketch one of these noble, armored figures.
Table of Contents
- What's the Big Deal with Knight Drawing?
- Getting Started with Your Knight Drawing Adventure
- Building the Foundation - Human Shape First
- Shaping the Head and Helmet for Your Knight Drawing
- Bringing Your Knight Drawing to Life - Body and Armor
- Exploring More Knight Drawing Ideas
- Keeping Your Knight Drawing Skills Growing
What's the Big Deal with Knight Drawing?
So, you might be wondering, why draw a knight anyway? Well, for many people, these armored figures represent something really captivating. They bring to mind tales of bravery, old castles, and, you know, a certain kind of historical charm. There's a timeless appeal to them, whether it's from stories you've heard, movies you've seen, or even games you've played. Creating a knight on paper gives you a chance to bring those tales and images into your own hands. It’s, in a way, a chance to connect with a bit of history, even if it's just in your imagination. Plus, they offer a wonderful chance to practice drawing different textures, like metal and cloth, which is pretty cool.
Drawing a knight also provides a fantastic opportunity to work on your figure drawing skills. A knight, after all, is a person wearing a lot of equipment. Learning to draw them means you're practicing how to show a human form underneath layers of clothing and armor. This is, you know, a really valuable skill for anyone who enjoys drawing people or characters. It helps you understand how bodies move and how fabric drapes, which are, you know, pretty essential things for any artist. And, as a matter of fact, the process itself is quite rewarding; seeing your knight take shape is a very satisfying feeling.
Getting Started with Your Knight Drawing Adventure
Okay, so you're ready to begin your knight drawing adventure. That's fantastic! The very first thing to keep in mind is that drawing is, like, a skill that anyone can pick up. It's not about being born with some special talent; it's more about practice and taking things one step at a time. This guide is going to walk you through the entire process, making it much easier for you to create a knight that you'll be quite proud of. We're going to start with the very basics, making sure you have a good foundation before we move on to the more detailed bits. Just remember to relax and enjoy the process; that's, you know, pretty important.
Gathering Your Knight Drawing Tools
Before you even put pencil to paper for your knight drawing, it's a good idea to gather a few simple things. You won't need anything fancy, just some basic art supplies that you probably already have around. A regular pencil, for instance, is absolutely perfect. You might want one that's not too hard, maybe a B or 2B, so it's easy to erase. An eraser is, of course, pretty essential for fixing any little mistakes you might make. And then, you know, some paper. Any kind of drawing paper will do, or even just a notebook. Having these simple items ready to go means you can jump right into the creative part without any delays, which is, you know, quite helpful.
Some people also find it useful to have a ruler for drawing straight lines, especially when it comes to the geometric shapes we'll use for the helmet or armor plates. But, honestly, you can do a lot just by sketching freehand, so don't feel like you absolutely need one. If you want to add color later, you might also consider having some colored pencils or markers ready. But for now, just the pencil, eraser, and paper are more than enough to get your knight drawing started. It's really about getting comfortable with the shapes first, and the coloring can always come later, which is, like, a pretty flexible way to work.
Building the Foundation - Human Shape First
As the original text suggests, a truly important step in drawing a knight is to first learn how to draw the human figure. This might sound a little strange at first, since you're aiming for a knight, not just a person. But think about it: a knight is, essentially, a person wearing a specific kind of outfit. If you can get the basic proportions and posture of the person right, then the armor will sit correctly and look much more convincing. It's, you know, pretty much like dressing a mannequin; you need the mannequin first. This foundational step is, in a way, what gives your knight a sense of weight and balance, making it appear more lifelike.
You don't need to be an expert at drawing detailed anatomy right away. We're talking about basic shapes and lines to represent the head, torso, arms, and legs. Think of it as creating a stick figure, but with a bit more volume. You might start with an oval for the head, then a simple line for the spine, and then, you know, some ovals or rectangles for the chest and hips. Lines for the limbs, with circles for the joints, can help you map out the pose. This initial sketch is very light, just to get the overall placement and movement right. It's almost like a blueprint for your knight drawing, providing a framework that you'll build upon later.
Why Start with the Human Shape for Knight Drawing?
So, why is this human shape step so important for your knight drawing? Well, it's because armor isn't just a rigid shell; it's designed to fit around a human body. If your knight's body underneath the armor looks off, then the armor itself will also look strange, almost like it's floating or squashing the person inside. By starting with the basic human shape, you ensure that your knight has believable proportions and a natural stance. This helps your finished piece look much more professional and, you know, quite believable. It's a fundamental principle in character drawing, really, and it applies just as much to armored figures as it does to any other person you might want to sketch.
Moreover, understanding the human form helps you make your knight appear dynamic. If you want your knight to be in action, perhaps swinging a sword or riding a horse, you need to know how the human body bends and twists. Trying to draw armor directly onto a blank page without considering the underlying figure can make your knight look stiff or awkward. So, basically, taking a moment to sketch out that simple human frame first gives your knight drawing a sense of movement and vitality. It's, like, a small investment of time that pays off in a big way when you see the final result. You'll find it makes the whole process much smoother, too.
Shaping the Head and Helmet for Your Knight Drawing
Alright, once you have that basic human figure sketched out, we can move on to the more specific elements of your knight drawing. We're going to start with the head, and then we'll add the helmet. The original text suggests beginning with a circle for the head, which is, you know, a pretty standard and effective way to start. This circle will act as a guide for the overall shape of the head, even though much of it will eventually be covered by the helmet. It gives you a good starting point for placement and size in relation to the rest of the body, which is, like, quite important for good proportions.
Within that initial circle, the next step is to create a square. This square, as the instructions mention, will serve as the opening for the helmet, particularly the visor area where the knight would see out. This is a crucial part because it defines the front of the helmet and gives it its distinct shape. You can, you know, make this square as wide or as narrow as you like, depending on the kind of helmet you envision. Some helmets have very narrow slits, while others have wider openings. This is where your creativity can start to come into play, even at this early stage of your knight drawing.
Adding Details to Your Knight Drawing Helmet
After you've got the basic circle for the head and the square for the helmet's opening, it's time to think about the many vertical lines mentioned in the original text. These lines are really important for giving the helmet its texture and form. Think of them as the individual bars or plates that make up the visor or the front of the helmet. You can add as many or as few of these as you like, making them thin or thick, depending on the style of armor you're aiming for. This is, you know, where your knight drawing really starts to get its unique character. You might also want to add some lines that curve slightly to suggest the rounded shape of the helmet itself.
When you're adding these details, remember that you have a lot of creative freedom. You don't have to make every knight drawing look exactly the same. Maybe your knight's helmet has a very ornate design, or perhaps it's quite plain and functional. You can experiment with different patterns of lines, or even add small rivets or decorative elements. If you're feeling a bit unsure, you can, like, always look at pictures of real historical helmets for inspiration. This stage is all about making your knight's headpiece feel solid and, you know, quite authentic. It’s a chance to really make the drawing your own.
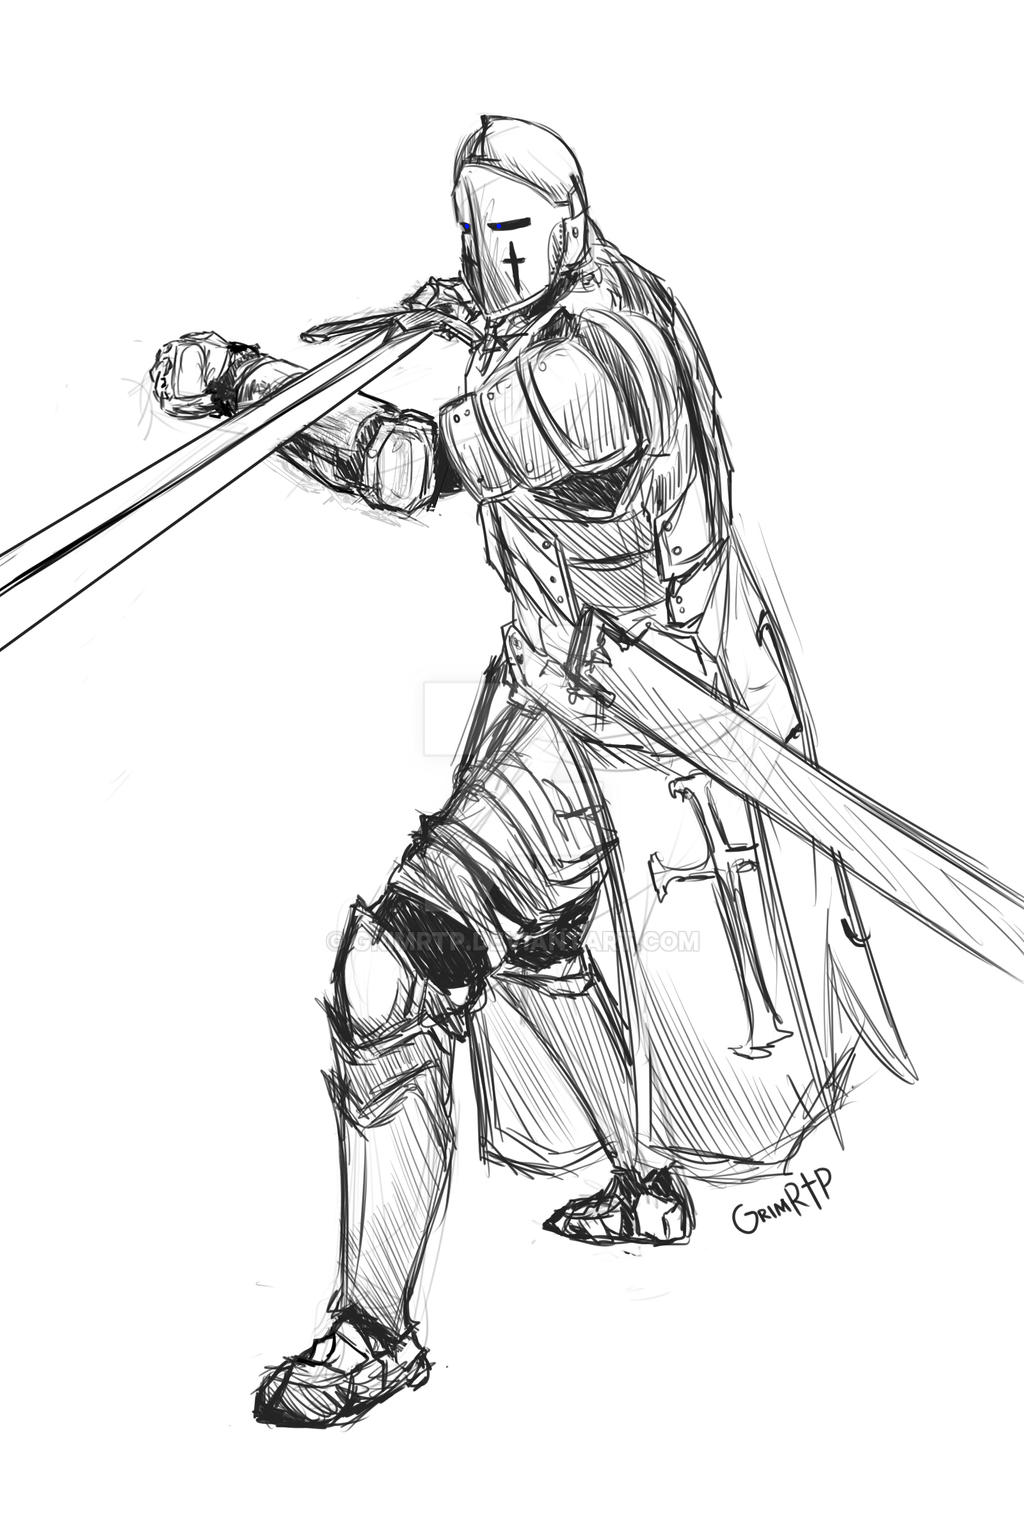
Bringing Your Knight Drawing to Life - Body and Armor
With the head and helmet taking shape in your knight drawing, it's time to bring the rest of the body to life with armor. Remember that underlying human figure you sketched? Now's the moment to start wrapping that frame in metal. Think about how the armor plates would fit over the shoulders, chest, arms, and legs. They wouldn't be perfectly flat; they'd have curves and overlaps to allow for movement. So, you know, you'll want to draw lines that suggest those contours and separate plates. It's almost like giving your figure a second skin, but a very tough, protective one.
For the torso, you might draw a breastplate that covers the chest and abdomen. For the arms, think about segmented pieces that allow the elbow to bend. The legs would have similar protection for the thighs, knees, and shins. Don't forget the hands and feet; knights often wore gauntlets and sabatons, which are, you know, armored gloves and foot coverings. You can make these details as simple or as elaborate as you prefer. This is where the magic of your knight drawing really comes together, as the figure transforms from a basic shape into a formidable warrior. It's, like, quite a satisfying transformation to watch unfold on your paper.
How Can You Add Personality to Your Knight Drawing?
Once the main armor is in place, you can truly start to add personality to your knight drawing. This is where the "add more or fewer details" instruction from the original text really comes into play. Does your knight have a shield? What kind of emblem is on it? Perhaps a flowing cape, or a specific type of weapon, like a sword, a spear, or an axe? These elements aren't just accessories; they help tell a story about your knight. They can suggest whether your knight is a noble champion, a seasoned veteran, or, you know, perhaps a mysterious wanderer.
You might also think about the texture of the armor. Is it smooth and polished, suggesting a new, well-maintained suit? Or is it dented and scratched, showing signs of many battles? You can use shading to give the metal a sense of weight and shine. Think about where the light would hit the armor and where shadows would fall. Even small things, like the type of plume on the helmet or the pattern on the tunic underneath the armor, can make a big difference in how your knight is perceived. This is, you know, quite a fun part of the process, allowing you to really make your knight drawing unique.
Exploring More Knight Drawing Ideas
After you've completed your first knight drawing, you might find yourself wanting to create more. That's a pretty common feeling! The world of knights is, you know, incredibly rich with different styles, eras, and stories. The original text mentions exploring "knight drawing ideas" collections, and that's a truly excellent suggestion. Looking at what other people have drawn, or even at historical references, can give you a fresh perspective and spark new ideas for your own creations. It's almost like having a visual dictionary of possibilities, just waiting for you to pick something out.
You could try drawing knights from different time periods, like early medieval warriors with chainmail, or later knights with full plate armor. Or, you know, you might want to experiment with different poses – a knight standing guard, a knight in battle, or even a knight resting. Each new drawing is a chance to try something a little different and to improve your skills. Remember, every time you put pencil to paper, you're learning something new about shapes, proportions, and how to make your drawings look more convincing. It's, like, a continuous process of discovery.
Where Can You Find More Knight Drawing Inspiration?
So, where exactly can you find these inspiring knight drawing ideas? Well, the internet is, you know, a treasure trove of images. Websites dedicated to art, history, or even fantasy games often have vast collections of knightly figures. Searching for "knight drawing ideas" or "historical armor" can bring up countless examples. You might find over 22 inspiring photos, as the text suggests, that can guide you through drawing knights step by step. Each photo can, in a way, provide clear, detailed instructions, not just on how to draw, but on what details to look for. This kind of visual reference is, you know, incredibly helpful for artists of all levels.
Beyond the internet, consider looking at books about medieval history or art. Museums, if you have the chance to visit one, often have displays of armor that can give you a real sense of their three-dimensional form and texture. Even fantasy art books or graphic novels can be a great source of inspiration, showing how artists interpret knights in their own unique styles. The key is to keep your eyes open for anything that sparks your imagination and makes you want to pick up your pencil again. It's, like, all about finding what truly excites you to create, which is, you know, quite personal.
Keeping Your Knight Drawing Skills Growing
The journey of learning to draw, whether it's a knight or anything else, is a continuous one. This guide has shown you how to draw a great looking knight with easy drawing instructions and a video tutorial, as the original text put it. By following the simple steps, you too can easily draw a perfect knight. But the learning doesn't stop after one drawing. To truly get useful drawing skills, as the text mentions, it's all about consistent practice. The more you draw, the more comfortable you'll become with your tools and the more intuitive the process will feel. It's, like, a bit of a muscle; the more you use it, the stronger it gets.
Don't be afraid to experiment with different styles or to try drawing your knight in various settings. Perhaps your knight is in a forest, or standing on a castle wall. These additions can help you practice drawing backgrounds and environments, which is, you know, another important skill. And remember, as the text points out, when you add details to your drawing, you can use your creativity to add more or fewer details. There's no single "right" way to draw a knight. Your unique style will naturally develop over time, which is, you know, quite exciting. If you're a kid, or even an adult just starting out, it's perfectly fine to have your parents or another adult help you if you get stuck. Drawing should always be a fun and rewarding experience.
So, you know, you've now got a pretty good idea of how to bring a knight to life on paper. We talked about starting with the basic human shape, which is, like, super important for getting the proportions right. Then we went through shaping the head and helmet, including those crucial vertical lines that give the helmet its character. We also covered how to build up the body armor, making sure it looks natural on your knight. And, you know, we touched on how to add those special touches that give your knight personality, like shields or specific weapons. Plus, we explored where to find more knight drawing ideas to keep your inspiration flowing. Basically, this guide has given you a straightforward path to creating your very own noble warrior, step by step, from the ground up.