Ever wanted to sketch a basketball that looks like it could bounce right off the page? Getting that perfect round shape, the distinct lines, and the right texture can seem like a tricky thing to do at first. But guess what? It's a lot simpler than you might think, and we're here to show you just how easy it can be to put that iconic ball on paper, ready for your own imaginary game.
Whether you're a budding artist just starting out or someone who simply enjoys putting pencil to paper, making a basketball come alive through your drawing can be a really satisfying experience. It's about breaking down a somewhat complex object into simple shapes and adding the details that make it instantly recognizable. So, we'll walk you through each step, making sure you feel confident with every line you make.
This guide is for anyone who wants to learn how to draw a basketball, helping you create a picture that feels real and has that sporty spirit. We'll cover everything from the basic outline to those special markings, giving you all the pointers you need to make your drawing look just right. You'll be surprised how quickly you can get the hang of it, actually.
Table of Contents
- Getting Started - What You'll Need to Draw a Basketball
- The Basic Shape - How to Draw a Basketball's Foundation
- Adding the Lines - How to Draw a Basketball's Signature Look
- Making it Look Real - How to Draw a Basketball with Depth
- What about the Texture? - How to Draw a Basketball's Surface
- Common Mistakes to Skip - How to Draw a Basketball Better
- Can I Use Digital Tools to Draw a Basketball?
- Practice Makes Perfect - How to Draw a Basketball Repeatedly
Getting Started - What You'll Need to Draw a Basketball
Before you even make your first mark, it's a good idea to gather up your art supplies. You don't need anything terribly special, just a few basic items that you likely have around the house. A pencil, perhaps a number 2, is a good pick because it's not too dark and can be erased without much trouble. You'll also want an eraser, a soft one works best, and some paper, any kind will do to begin with. Some folks find a compass helpful for making a perfect circle, but you can certainly freehand it, too it's almost a personal choice.
Having a clear space to work is pretty helpful, you know, somewhere you can spread out a bit. Good lighting also makes a difference, so you can clearly see what you are doing. If you are serious about learning how to draw a basketball, having your tools ready means you won't have to stop midway to hunt for something. It keeps your creative flow going, which is really what you want.
You might also want to have a picture of a real basketball nearby, just for reference. This can help you get a better feel for its form and the way its lines curve. It's like having a little guide right there with you, helping you learn how to draw a basketball that looks quite authentic. Just a little visual aid can make a big difference, honestly.
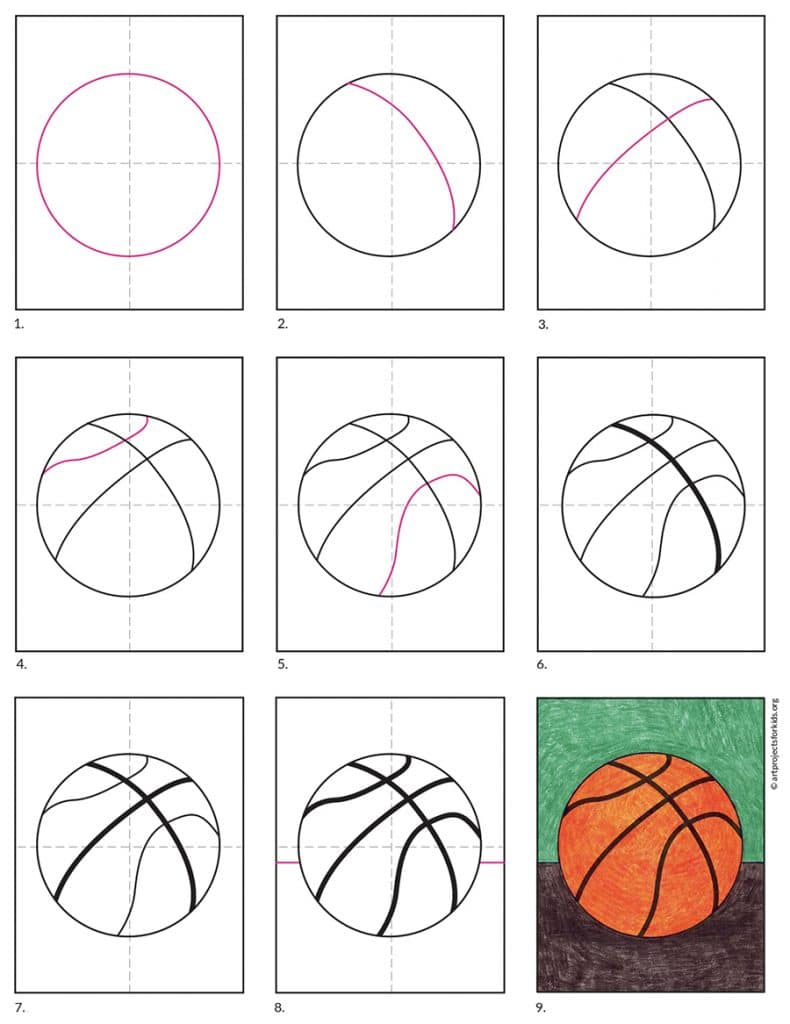
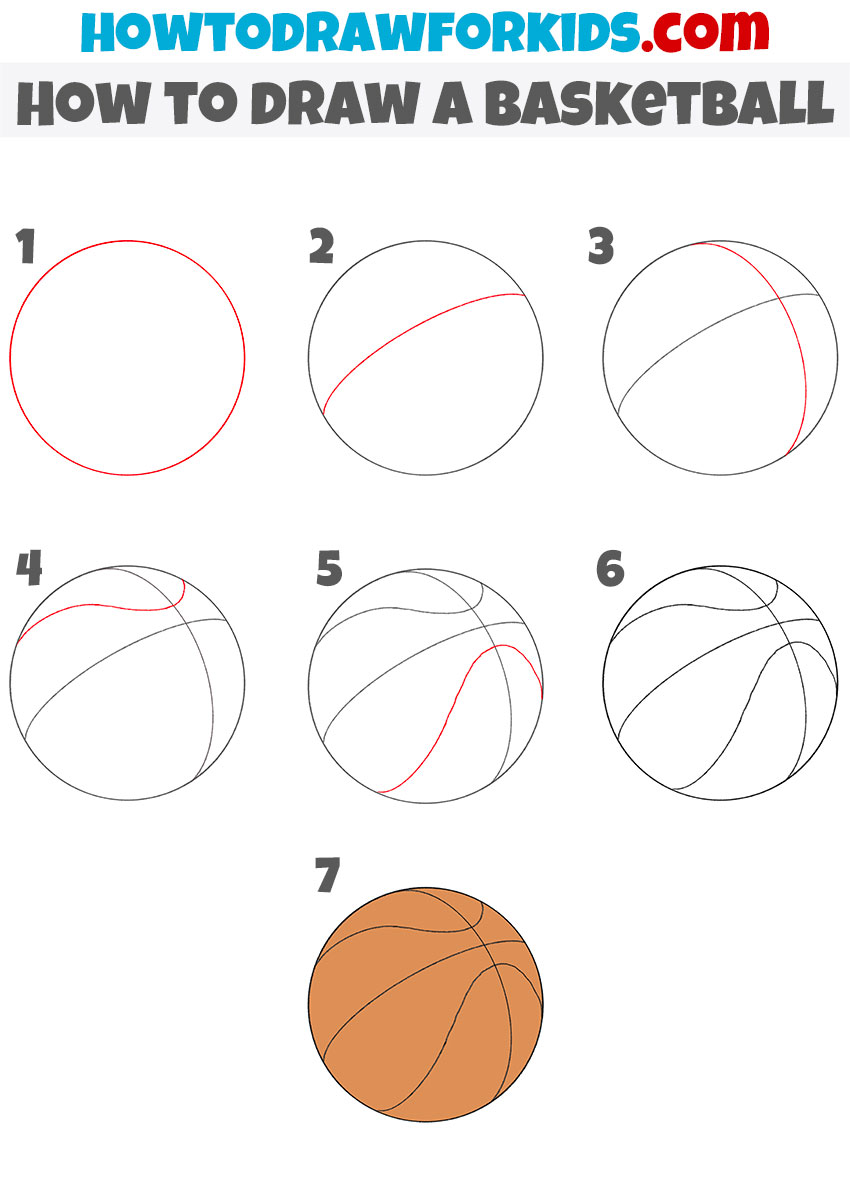
The Basic Shape - How to Draw a Basketball's Foundation
The very first step to putting a basketball on paper is to create its main body. This is basically a simple round form. You can use a compass if you have one to make a perfectly round outline, or you can try to draw a circle by hand. If you're drawing it by hand, try making light, loose marks first, kind of like sketching a lot of little arcs until you get a shape you like. Then, you can make that final circle a bit darker, so that's a good way to start.
Think of it like this: a basketball is a sphere, which is just a three-dimensional circle. When you draw it on a flat surface, you're trying to give the impression of that roundness. So, while you start with a flat circle, you'll soon add things that make it seem to pop out. This initial circular shape is the anchor for everything else you'll do, you know, the very base of how to draw a basketball.
Don't worry if your first circle isn't perfectly round. The aim here is to get a general idea of the ball's size and placement on your paper. You can always make small changes to it later on. This is just the very beginning, and it's a step that many people find a bit tricky at first, but with a little practice, it gets much easier, in some respects.
Adding the Lines - How to Draw a Basketball's Signature Look
Once you have your basic round shape, the next step is to add the special markings that make a basketball a basketball. These are the lines that curve across its surface. There are two main lines that go around the ball, almost like an equator and a prime meridian, if you can picture that. One line will go horizontally across the middle, and the other will go vertically, but they will both appear curved because of the ball's roundness. This is a crucial part of how to draw a basketball that looks correct.
To make these lines look like they are wrapping around the ball, you need to draw them with a gentle curve. The line that goes across the middle should curve slightly upwards at the ends if you're looking at the ball straight on, and the line that goes up and down should also curve. Think of how a string would lie on a ball; it wouldn't be straight, would it? So, that's what you're trying to show, actually.
After those two main lines, you'll add two more lines that connect the ends of the horizontal line to the vertical line, forming those distinct sections. These also need to be curved, following the shape of the ball. It's like you're creating segments on the ball's surface. Getting these curves right is a bit of a skill, but it's what truly defines how to draw a basketball, giving it its familiar pattern. Take your time with these, drawing them lightly first.
Making it Look Real - How to Draw a Basketball with Depth
Now that you have the main form and the signature lines, it's time to give your basketball some sense of three-dimensional space. This means adding shadows and highlights. Light doesn't hit every part of a round object the same way. One side will be brighter where the light source is, and the opposite side will be darker, so that's pretty much how it works. This contrast between light and dark is what makes your flat drawing appear to have volume, giving it a very real look.
To start, pick a spot where you imagine the light is coming from. If the light is coming from the top left, for example, then the top left part of your basketball will be the brightest. The bottom right side will then be the darkest. You can use your pencil to gently shade in the darker areas, gradually building up the tone. Remember to make the shading follow the curve of the ball, so it doesn't look flat, you know?
You can use different levels of pressure on your pencil to create different shades. Light pressure for lighter shadows, more pressure for deeper ones. You might even use a blending tool, like a paper stump or just your finger, to smooth out the shading and make it look more even. This part is really where your drawing starts to come alive, making it a much more convincing how to draw a basketball piece. A little bit of thoughtful shading goes a very long way.
What about the Texture? - How to Draw a Basketball's Surface
A basketball isn't perfectly smooth; it has a slightly bumpy, pebbled feel to it. To show this in your drawing, you can add some subtle texture. This doesn't mean drawing every single bump, but rather creating an overall impression of that surface. You can do this by making very small, light dots or tiny, irregular marks over the shaded areas. It's a bit like creating a very fine speckle, so that's one approach.
This texture should be more noticeable in the shaded parts of the ball, as shadows tend to make surface details more apparent. In the brighter areas, the texture might be less visible or even disappear entirely. It's about giving hints of the surface without making it too busy. This step really helps to complete the look and feel of how to draw a basketball, giving it that touch of realism.
You can also think about how light catches those tiny bumps. Sometimes, a very small, bright highlight on a few of these 'pebbles' can make the texture seem even more real. This is an advanced step, but it can make a big difference. Just a little bit of careful marking can suggest a lot of detail, basically, without having to draw every single thing.
Common Mistakes to Skip - How to Draw a Basketball Better
When you are learning how to draw a basketball, there are a few common slip-ups that people often make, and knowing about them beforehand can help you avoid them. One of the most frequent is drawing the lines too straight. Remember, the lines on a basketball curve because they are on a round surface. If your lines are straight, the ball will look flat, so that's something to watch out for.
Another common thing is making the shading too uniform. If you shade the entire ball with the same darkness, it won't look round. You need to have those lighter and darker areas to create the sense of depth. Think about where the light is hitting and where the shadows would naturally fall. This variation in tone is really what gives it shape, you know?
Sometimes, people also make the ball too perfect, almost like a machine drew it. A little bit of imperfection can actually make your drawing seem more natural and lively. Don't be afraid to let your hand show in your work. It's about capturing the spirit of the object, not making a photographic copy. These little tips can really help you improve how to draw a basketball that feels right.
Lastly, rushing through the process can lead to less satisfying results. Drawing takes time and patience. If you hurry, you might miss important details or make your lines less precise. Take breaks if you feel frustrated, and come back to your drawing with fresh eyes. This slower approach can lead to much better outcomes, in a way, allowing you to really focus on how to draw a basketball with care.
Can I Use Digital Tools to Draw a Basketball?
Absolutely! If you prefer working on a screen rather than with paper and pencils, there are some great digital ways to sketch a basketball. Many people find digital drawing to be a really fun and flexible option. You get undo buttons, layers, and a whole bunch of brush types, so that's a lot of freedom. It's a different feel from traditional drawing, but the basic ideas of shape, line, and shading still hold true.
You know, there's this rather neat drawing spot online, and it's actually for everyone, young or old. It's a place where you can make digital pictures, then share them with others on the internet, or even save them in common picture types like JPEG, PNG, SVG, and PDF, so that's pretty handy.
Making art, fixing up pictures, or even putting together your next business card becomes quite simple here, in a way. You can craft pictures for your social media updates, for online advertisements, for things you print on paper, or even, you know, for clothes. If you need to make a quick change to a photo, it's just a matter of pulling it over and letting it go, more or less.
There are some rather clever little tricks, too. For instance, if you sketch the letter "S," it's a quick way to get to the different style choices. And, like, if you keep a button pressed down while tapping the screen with different finger movements, you can get to tool setups you've already put in place. It's all the stuff you might want to know about using this drawing spot, basically. You can even check out videos for good ideas on using it and getting the most from what it offers. To save a picture you've made, you just sketch a "check" mark. Once you're on the saving screen, you press and hold your finger on your drawing until a list shows up, then you press the spot that says "save." And to clean off your drawing area, you just make a "circle" shape, that's it.
Using digital tools can speed up some parts of the drawing process, especially when you're trying out different looks or fixing mistakes. You can easily adjust colors, resize elements, and experiment without wasting paper. This can be a really good way to learn how to draw a basketball, as it lets you try things out without much fuss. It's a pretty forgiving medium, in some respects.
Practice Makes Perfect - How to Draw a Basketball Repeatedly
The saying "practice makes perfect" really does hold true for drawing, and especially for learning how to draw a basketball. The more you try, the better your hand will get at making those smooth curves and consistent lines. Don't expect your first drawing to be a masterpiece; it's all part of the learning journey. Each time you put pencil to paper, you're improving your skills, even if it's just a tiny bit, you know?
Try drawing basketballs of different sizes, or from different angles. Sketch one that's bouncing, or one that's just sitting still. This helps you understand its form in various situations and strengthens your ability to represent it on paper. It's like building up your visual vocabulary, basically. The more you experiment, the more comfortable you'll become with how to draw a basketball in any setting.
Keep your old drawings so you can look back at them and see how much you've grown. It can be really encouraging to see your own progress. Even if you feel a little frustrated sometimes, remember that every artist started somewhere. Just keep at it, and you'll definitely see your drawing abilities get better and better. Consistency is a very big part of it, honestly.
So, grab your drawing tools, whether they are traditional or digital, and just start putting lines down. Don't overthink it too much. The goal is to enjoy the process and watch as your basketballs take shape. With a little time and effort, you'll be able to sketch a basketball that looks ready for the court, any time you want to, so that's a good thing.
This guide has walked you through the steps to sketch a basketball, starting with its basic round form. We covered how to add the distinctive curved lines and then discussed how to bring it to life with shading and subtle texture. We also touched on common drawing errors to avoid and explored how digital tools can help with your creative process. Finally, we emphasized the importance of consistent practice to improve your drawing abilities.