Have you ever watched a busy little bee flit from flower to flower and thought, "I would really like to make a picture of that"? It is a pretty common feeling, you know, when you see something so active and full of life. Well, good news, because getting a bee onto your paper is actually a lot simpler than you might think, and we are going to walk through it together right now.
People often feel a little unsure about starting a drawing, especially if they want it to look just right, or, you know, even somewhat like the real thing. But the truth is, anyone can learn how to put a bee on paper, no matter if you have drawn before or if this is your very first attempt at art. We are going to show you some really easy ways to get started, using things like basic forms and simple lines.
So, get ready to grab some paper and a marker, or whatever art stuff you have close by, and let us make some delightful little creatures. This guide is made for everyone, from little ones who are just starting to put crayon to paper, to grown-ups who feel inspired by the natural world around them. We will take it one step at a time, making sure you feel good about each line you add.
Table of Contents
- What Do You Need to Draw a Bee?
- How to Draw a Bee - Starting with Simple Shapes?
- Making Your Bee Look Just Right - How to Draw a Bee's Body and Parts
- Can You Make Your Bee Look Different?
- Giving Your Bee Life - How to Draw a Bee with Details and Color?
What Do You Need to Draw a Bee?
Before we put any marks on the paper, it is a good idea to think about what items you will want to have ready. You might think you need a whole lot of fancy art supplies, but that is not really the case here. For making a bee picture, you just need a few basic things that you probably already have lying around your home, which is pretty convenient, actually.
The main things you will want are simply some paper to draw on and something to draw with. A regular pencil works perfectly for sketching out your initial shapes, as you can always lighten or erase lines that you do not want later on. Then, a marker or a pen can be used to go over those lines once you are happy with how your bee is taking shape, making them stand out a bit more.
You can use any kind of paper, whether it is a blank sheet from a pad, a piece of printer paper, or even a page from a sketchbook if you have one. The important thing is just having a surface to create on. And for drawing tools, really, any sort of pencil, crayon, or colored pencil will do the job. The goal is to have fun and make something, so do not worry too much about having exactly the right brand or type of supply, you know?
Gathering Your Art Tools for How to Draw a Bee
When you are getting ready to begin your bee drawing, having your chosen tools close by makes the whole process smoother. You might want to have a few different things to try out, just in case one works better for a certain part of the bee than another. For instance, a lighter pencil for those initial guide lines, and something darker for the outlines.
Some people like to use an eraser, too, especially when they are just learning how to draw a bee. It helps if you want to adjust a line or clean up any extra marks. If you plan to add color, then having some crayons, colored pencils, or even watercolors ready will be helpful. The choice of coloring tools is completely up to you and what you like using the most, naturally.
Remember, this is about making something that brings you joy, so there is no need to go out and buy a whole new set of art supplies just for this. Use what you have, experiment a little, and see what feels good in your hand. The most important tool, really, is your own desire to create a little buzzing creature on paper, which is a pretty cool thing.
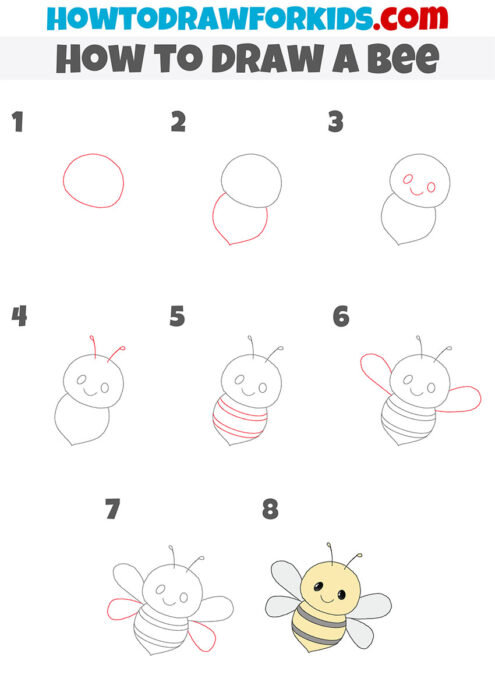
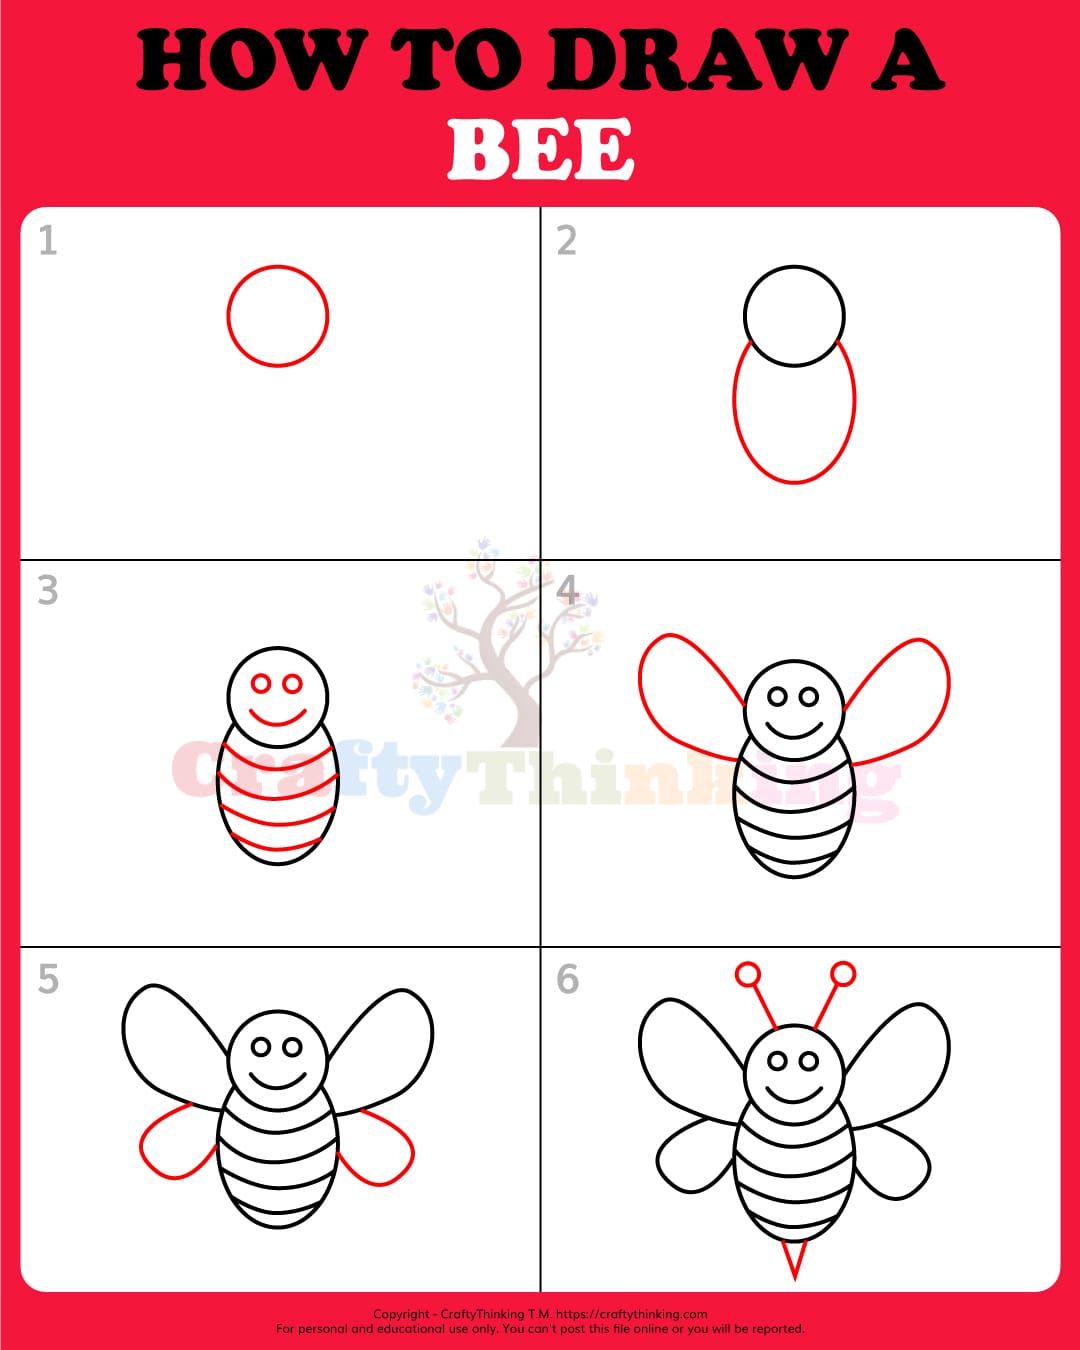
How to Draw a Bee - Starting with Simple Shapes?
Now that you have your paper and your drawing tool ready, let us talk about how we actually start putting the bee on the page. The secret to drawing many things, including our little bee, is to begin with very simple forms. Think about shapes you already know, like circles and ovals. These basic outlines are like the building blocks for our bee, giving us a good base to work from.
A really neat trick some people use when they are learning how to draw a bee is to start with something as familiar as a letter. For instance, you can begin by drawing the letter 'B'. It might sound a little strange, but this can give you a starting point for the bee's main body, providing a simple curve that you can then build upon. It is just one way to get things going, of course.
Another common way to start is by making a circle for the bee's head. Sometimes, getting a perfect circle can feel a little tricky, but do not worry about it being absolutely perfect. Just draw a roundish shape, and that will be good enough. This circle will be the very first part of your bee that you put down, and everything else will kind of grow from there, you know?
Beginning with Basic Forms for Your Bee Sketch
Once you have that first simple shape, like the head circle, you can then add another shape for the main part of the bee's body. This might be an oval, or perhaps a slightly longer, rounded shape connected to the head. These initial light lines are sometimes called "construction lines" because they help you build the overall structure before you add the more defined details, basically.
Using these light guide lines is a very helpful practice. They are not meant to be the final lines of your drawing; they are just there to help you place things correctly. You can always go back and erase them later, or just draw over them with darker lines. This approach makes the whole process feel a lot less intimidating, as you are not trying to get everything perfect on the first try.
So, you have a head shape, and a body shape. Maybe you even started with that letter 'B' idea. The next step is to think about how these parts connect and how big they are in relation to each other. This is where you start to get a sense of the bee's overall size and its general appearance, which is pretty important for how to draw a bee that looks like a bee.
Making Your Bee Look Just Right - How to Draw a Bee's Body and Parts
After you have those basic shapes for the head and body in place, it is time to start giving your bee its specific features. Think about the different parts a bee has: wings, legs, and those interesting little antennae. Adding these elements is what really brings your simple shapes to life and makes them recognizable as a buzzing insect.
For the wings, you might draw two oval-like shapes coming out from the upper part of the bee's body. They can be somewhat transparent in appearance, or you can just draw their outline. Some people like to make them look like they are fluttering, too, which adds a lot of movement to the picture. You can even vary the thickness of the lines you use for the wings, making them appear lighter or heavier depending on what you are trying to show.
Next, consider the legs. Bees have six legs, and you can show these with simple lines extending from the underside of the body. They do not have to be overly detailed; just a few lines that suggest where the legs are can be enough. And for the antennae, two small, curved lines coming from the top of the head work well. These small additions really make a big difference in how your drawing looks, you know?
Adding the Main Sections to Your Bee Picture
Once you have the head, body, wings, and legs sketched out, your bee is really starting to take form. This is where you can begin to refine your lines, making them a little darker or smoother where you want the final outline to be. You can also start thinking about the bee's basic structure and how its parts fit together, which helps with how to draw a bee that looks natural.
You might want to go over your initial light lines with a slightly firmer touch, or even switch to a darker pencil or pen. This step helps to define the shape of your bee and makes it stand out from any construction lines you might have used. It is like putting the finishing touches on the main structure before adding all the smaller bits.
Paying a little attention to the bee's general body shape and where its parts are placed can make your drawing look more convincing. For instance, the bee's body is usually a bit plump, and its head is connected in a particular way. Just observing these things can help you make adjustments to your sketch, making it feel more like a real creature, basically.
Can You Make Your Bee Look Different?
One of the really fun things about learning how to draw a bee is that you are not stuck with just one way of making it. You can draw bees in so many different looks and feels, from ones that seem like they could fly right off the page to those that are just plain silly or sweet. It all depends on what kind of bee picture you want to create.
For example, you can make a bee that looks very real, with lots of small details and shading that give it a sense of depth. Or, if you prefer something more playful, you could draw a cute, cartoon-like bee with big eyes and a friendly smile. There are also ways to draw bees that are quite funny, perhaps with exaggerated features or in an unusual pose, which is pretty neat.
You can even explore different types of bees. Some people like to draw honey bees, which are quite common, while others might try to draw a bee from a video game, like a Minecraft bee. The key is to experiment with different styles and see what you enjoy drawing the most. There is no single "right" way to make a bee picture, you know?
Exploring Various Styles for How to Draw a Bee
When you are thinking about different styles, consider how you use your lines and shapes. For a cartoon bee, you might use very simple, smooth lines and round shapes. For a more realistic bee, you might add more texture, perhaps showing the fuzzy body or the delicate veins in the wings. It is all about how you choose to represent the bee on your paper, in a way.
Some tutorials even show you how to draw a bee that starts with a very basic, doodle-like approach, which is great for just getting ideas down quickly. Others might focus on making a bee that looks like it is smiling or flying, adding a sense of action or emotion to your artwork. The possibilities are quite wide open, so feel free to play around with them.
This variety means that whether you are a beginner or someone who has drawn a lot, you can find a project that suits your skill level and your personal taste. It is about having fun with your art and expressing yourself. So, do not be afraid to try out a few different looks for your bee and see which one you like best, you know, just experiment a little.
Giving Your Bee Life - How to Draw a Bee with Details and Color?
Once you have the main outline and style of your bee established, the next step is to add those smaller details that really make it pop. This is where your bee starts to look less like a collection of shapes and more like a living creature. Think about the little things that make a bee a bee, like its stripes and perhaps its eyes.
For the bee's body, you can add stripes across its middle section. These can be simple lines or solid bands of color. The eyes are also important; you can make them small dots, or if you are going for a cute cartoon look, you might make them big and expressive. These little additions really bring out the character of your bee, basically.
After you have added all the details you want, you can think about bringing in some color. Bees are usually yellow and black, but you could choose any colors you like! Adding color makes your drawing even more vibrant and gives it that final touch. You can use crayons, colored pencils, markers, or even paint, whatever you have on hand, of course.
Finishing Touches and Adding Hues to Your Bee Art
When you are adding color, you can choose to fill in the areas solidly, or you can try some shading to give your bee more depth. For instance, you might make one side of the bee slightly darker to show where the light is hitting it. This adds a lot of dimension to your picture, making it look more complete, in a way.
Think about the background, too. Your bee does not have to be floating in empty space. You could add a simple flower, a leaf, or even a few clouds in the sky to give your bee a home. These little background elements can really make your bee picture feel like a complete scene, and it is pretty easy to do.
The whole process, from those first light shapes to the final splash of color, is about following steps that build upon each other. Whether you are aiming for a bee that looks very real or one that is just plain happy and smiling, each step helps you get closer to your finished art. So, keep going, and soon you will have your very own buzzing creature on paper, which is pretty cool.